Raspberry Pi Photo Booth
Raspberry Pi Photo Booth
This is just another Raspberry Pi Photo Booth. I can’t say this is my idea because I used this Instructables as inspiration. I can say that I’ve modified the software to suit my needs. Plus I added few features. Because I used what I had laying around, there was some improvising needed.
Sneak peak of Photo Booth updates:
- Now runs on Raspbain Buster Lite with PHP7.3
- Will run on any Raspberry Pi (tested up to 3B+)
- Added an optional green screen effect (needs some tweaking)
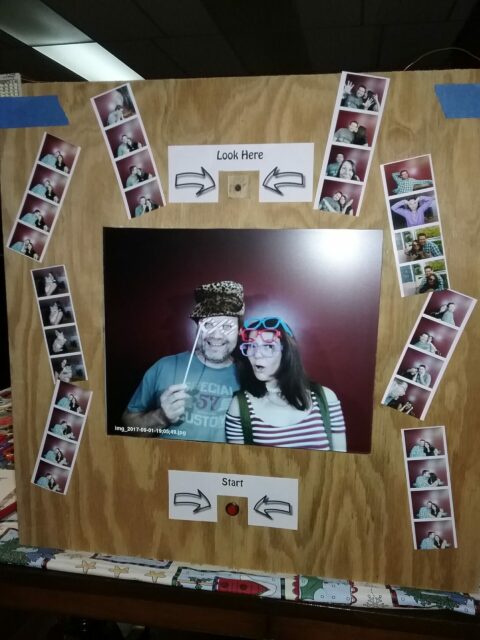
- Added a preview button to verify proper positioning
- Enable a GPIO pin to control a flash
- Created custom LED flash lamps
Photo Booth Parts List
- Raspberry Pi 3A+ (any Pi will work)
- 17″ monitor (saved from my scrap pile)
- 50mm Arcade illuminated push button (donated by a friend)
- Laptop power brick (saved from my scrap pile)
- Wireless router (saved from my scrap pile)
- 3 push buttons (2 latching and 1 momentary)
- 1/2″ plywood (saved from my scrap pile)
- 32 ultra bright white surface mount LEDs (a few bucks on amazon or ebay)
- Copper clad PCB material (a few bucks on amazon or ebay)
- 5volt 5amp regulator (bulk buy for random projects)
- Adjustable 3amp regulator (bulk buy for random projects)
- Raspberry Pi Camera (5 or 8mega-pixel is fine)
Rev.0 Raspberry Pi Photo Booth Operation
The photo booth takes four photos, one every five seconds. So after starting your photo session the screen shows a preview of your pose and overlays a five second count down. After the count down the first image is captured. The process repeats until all four are captured. The process performed by the photo booth as follows:
- First four images are captured
- Next each image has a white frame added
- Then stack the four framed images making a filmstrip
- And then to complete the filmstrip add a white frame
- Note: The screen has been blank for about 15 seconds
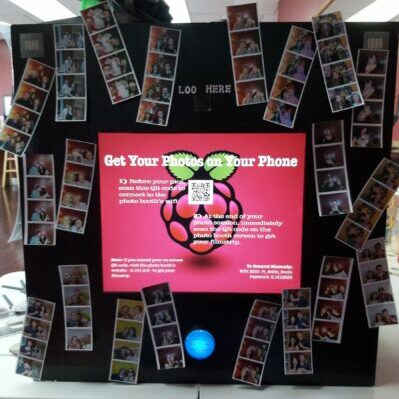
- After that download your filmstrip by scanning the displayed QR code
- Finally after a five second delay the photo booth starts a slideshow of all images captured.
This is a pretty simple and effective process. So on with my build.
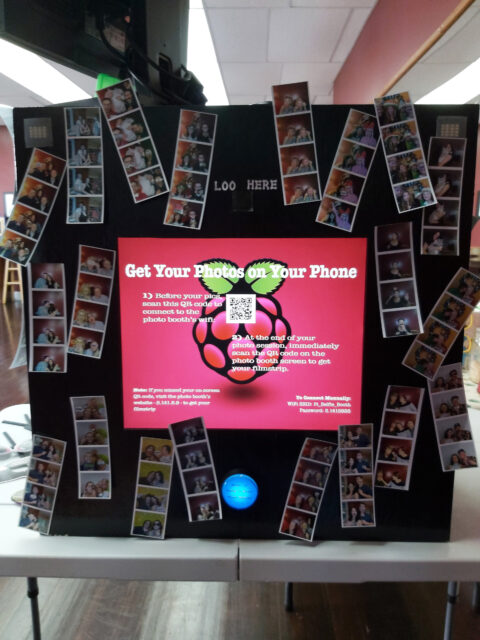
WIFI Photo Booth rev. 0
My Photo Booth started as a rough box. Because I didn’t have all the parts used in the Instructables, I improvised and used what I had laying around. I used a Raspberry Pi model B and a 17″ 5:4 monitor. I didn’t have a WIFI adapter so I used a old WIFI router. After loading the software provided in the Instructables the photo booth mostly working. The four things I had to fix were:
- The QR code at the end gave a 404 error
- A pushbutton replaced the touch screen
- Screen dimensions (my screen 1280×1024)
- I didn’t want constantly lit lights
To fix the 404 error generated by the QR code, I had to edit the combine script to have the correct IP address. Then to replace the touch screen start with a pushbutton start I had to edit and add code to the photo booth control file. For the change in screen size I edited the screen dimensions in the photo booth control file. And after a bunch of research I found that I could create a Raspberry Pi GPIO pin to control a flash, more to follow.
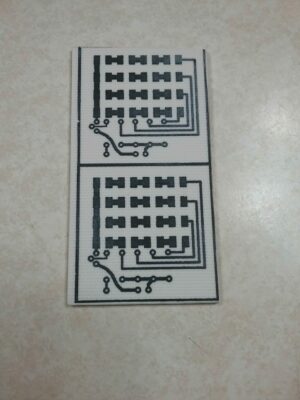
Building The LED Flash Modules
Since I had almost 100 surface mount ultra bright white LEDs from another project, I decided to use them. The GPIO flash pin on the Raspberry Pi is 3.3 volt signal. So I designed the following circuit board for the flash modules.
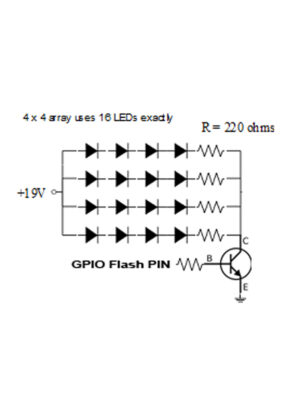

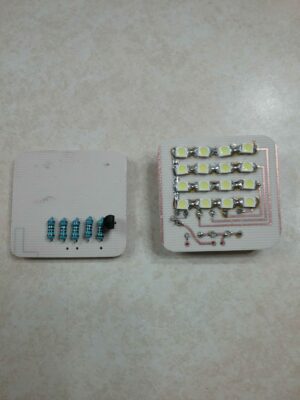
Note: The Pi’s GPIO can’t control a standard xenon flash or high current LED flash without some additional circuitry. So be careful how you use the flash pin. Notice I use a transistor as a switch to drive the LEDs.
With the flash modules completed I had to enable the Raspberry Pi GPIO to control it. There had to be a better way to control a GPIO pin during image capture than manually. So after some research I found picamera documents. This document described how to setup a GPIO pin to control a flash during image capture. Once done simply add one line to the variables of the python script (cam.flash_mode = ‘on’) and the flash will work.
You can use any of the flash modes found on a point and shoot camera. Because I didn’t what a selector switch, I coded the flash to “on”. Whether needed or not the “on” setting will blink the flash twice for every image captured. The first blink is for metering and the second is for image capture. These are the available flash modes, “off”, “auto”, “on”, “redeye”, “fillin”, and “torch”. My flash works very well set to “on”.
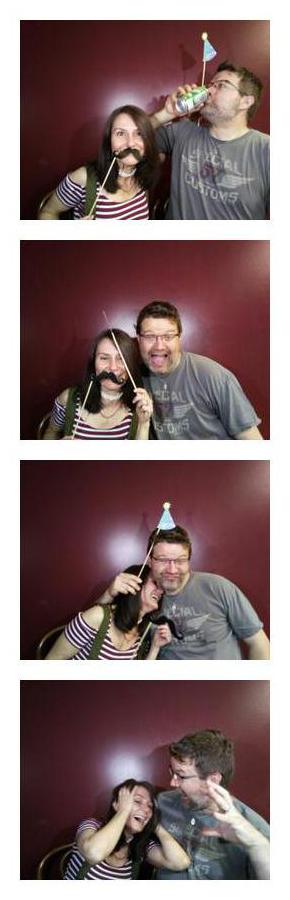
Sample Filmstrips
Rev.0 of the photo booth took these sample filmstrips in a fairly dark room. A five foot tall standing lamp next to the photo booth provides just enough light to see the count down to a fun filmstrip. So as you can see the two flash modules do a nice job illuminating the scene.

WIFI Photo Booth rev. 1
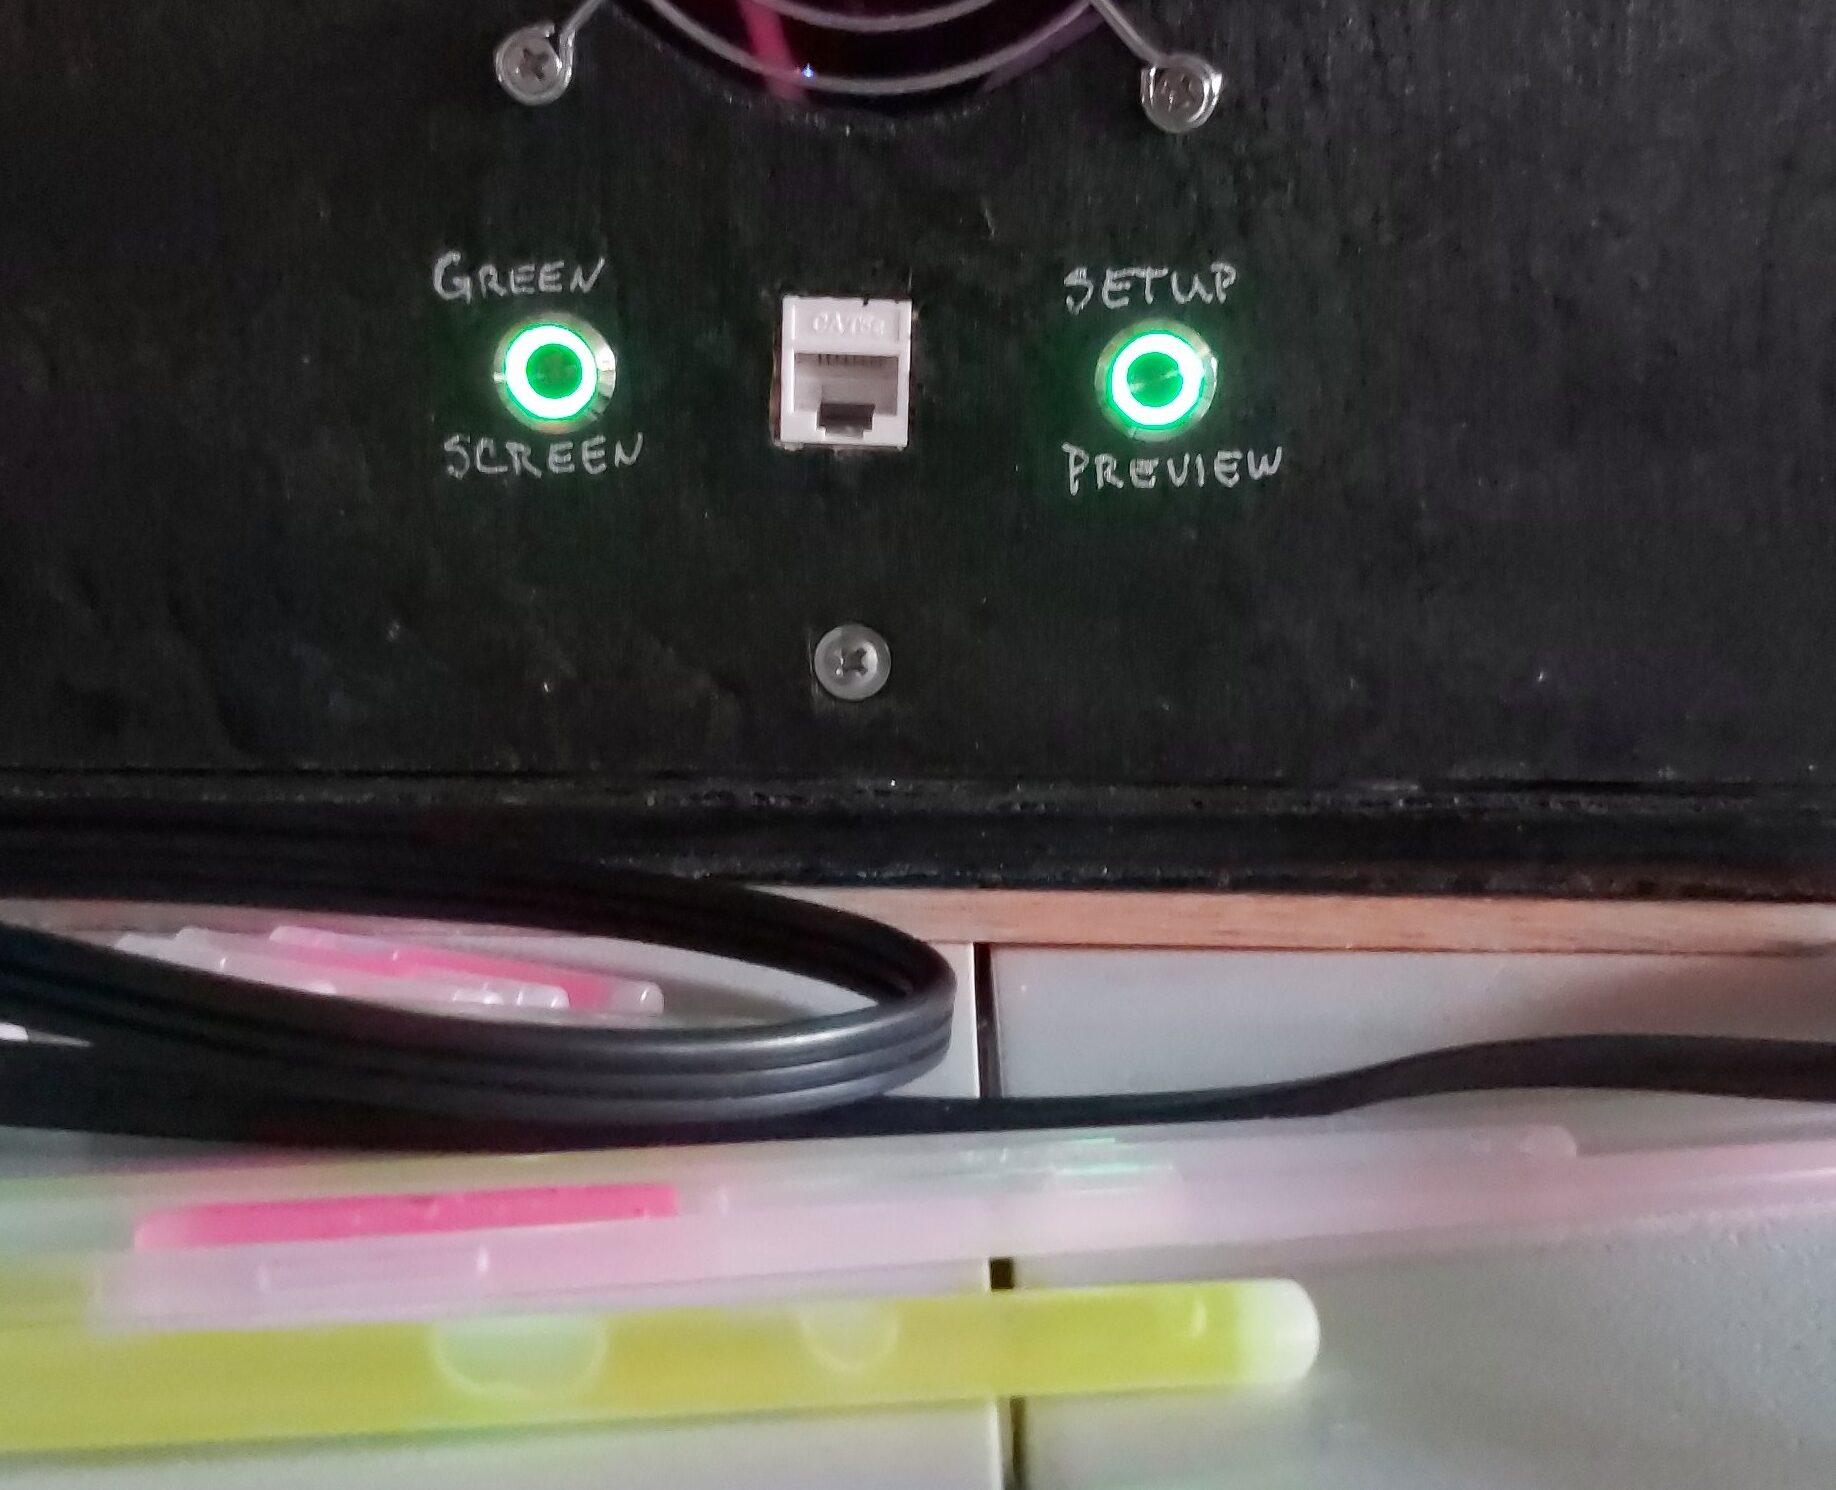
My rev.1 Photo Booth has a new brain. This version has a Raspberry Pi 3A+ to improve processing power for the added green screen effect. The control software now checks the status of the green screen button. Button status determines if I’m using a green screen or not. I can’t wait to use the new green screen feature.
I also added a button and a few lines of code to generate a setup preview. As a result, I can get the photo booth and backdrop setup correctly. My best friend recommended this preview function. I have to say it was a great idea and works great too.

Green screen notes
FYI, the green screen needs more lighting to prevent shadows. These shadows create different shades of green. As a result of shadows the green screen effect will not work as well. CombineGS codes my lighting configuration and green screen color into the script. So using the green screen effect requires editing the combineGS script to match your screen color and lighting. You can use this link to learn more about green screen lighting.
Rev.1 Raspberry Pi Photo Booth Backdrop
- First checks if green screen is selected
- Next four images are captured
- Then the screen displays “Processing Images Please Wait”
- And then each image has a white frame added
- After that stack the four framed images making a filmstrip
- Next to complete the filmstrip add a white frame
- Then download your filmstrip by scanning the displayed QR code
- Finally after a five second delay the photo booth starts a slideshow of all images captured.
Rev.1 Raspberry Pi Photo Booth Green Screen
- First checks if green screen is selected
- Next four images are captured
- Then the screen displays “Processing Images Please Wait”
- And then transparent pixels replace the green screen
- After that each images gets a cool electronic backdrop
- Next the four images with added backdrops are saved
- Then each image has a white frame added
- And then stack the four framed images making a filmstrip
- After that to complete the filmstrip add a white frame
- Next download your filmstrip by scanning the displayed QR code
- Finally after a five second delay the photo booth starts a slideshow of all images captured with the cool electronic backdrop.
GPIO connections and software

This is the connection diagram that I use. These connections have been verified to work on the Raspberry Pi shown above and Raspberry Pi 3A+. They should also work on a Raspberry Pi 4B. For a copy of the software feel free to contact me.
One final note: The photo slideshow only appears on the photo booth screen, so check back for the remote photo booth slideshow viewer.
2026 Upgraded Brain
I recently found myself with a spare Raspberry PI4B (4GB of ram) laying around. Therefore, I decided to upgrade from a PI3A+ to PI4B. With the upgraded brain I added a USB GPS dongle so I could add location data to the capture images. Because the photobooth takes four pictures and converts them into a filmstrip the exif data is stripped away. The PI4 has the extra power needed to write the exif data with location to the images. I performed a fresh install of Buster because not all the software is supported in newer Linux versions. Then I installed the photobooth software and dependencies.
Software Optimizations
With the new software running perfectly on the new PI4 I started adding new features and optimizing old features. So, the old way took 10 seconds to create a filmstrip with no greenscreen and 70 seconds with a greenscreen. After adding exiftool and the GPS script, processing time increased to 15 seconds and 78 seconds respectively. The BASH scripts that combine the 4 images into a filmstrip were slow. Therefore, I added parallel processing and while loops. Then used exiftool to apply GPS location and camera data to all images. These changes dropped the image processing time to about 8 seconds for non-greenscreen and 40 seconds for greenscreen.
Web UI
Because I was happy with the processing improvements I moved on to improving the web UI. The web UI was clunky and slow on a mobile device. I updated the web UI to be mobile friendly but quickly realized that there was a huge amount of data flowing from the photobooth to a user’s phone. So now I updated the combine scripts to create web sized versions of the images for the gallery pages on the web UI. Now processing times were back up to the old numbers.
Back to Optimizing
Back to the optimizing drawing board I modified the exiftool command to apply the data in a single call. Then switched from imagemagick to graphicsmagick commands and created a dynamic ram disk. Now all image processing occurs in ram and graphicsmagick is better at parallel processing than imagemagick. With all these changes processing times were now 2 seconds for non-greenscreen and about 11 seconds for greenscreen. Just a quick note I switch from hard coded greenscreen imagemagick commands to Fred’s Greenscreen Script. This change allows for better greenscreen effect under varied lighting conditions. Fred’s Imagemagick Scripts are really great.
Web UI Features
With image processing times at their best, I started adding new web UI features. One of the biggest questions was, how do I get my filmstrip or how do I get just one image from the filmstrip? So now the filmstrip and image galleries have separate pages with download buttons under each image. These buttons make downloading a filmstrip or a single image simple and intuitive. The web UI also has an upload page. This page allows users to upload 12 candid images at a time (via dropzone) from the event to the photobooth. Because iPhones store photos in HEIC format the uploads are confirmed as images, converted to jpeg and web sized version. The web sized versions are used on the gallery and slideshow pages. The web sized versions make the web UI, user experience smooth, and data flow low.
Final Thoughts
The photobooth is working great and the user experience with the web UI vastly improved. Processing times for both greenscreen and non-greenscreen are minimized so user wait times are low. Even with 400 pictures in the gallery and slideshow things remain buttery smooth on the photobooth or a mobile device. Also, the remove slideshow viewer was upgraded from a PI Zero W to PI3A+ running 3D PictureFrame (picframe). Coming soon, check the remote slideshow viewer post for updates on that project.